


About a year ago, I was very impressed by a digital sign a friend of mine had running in his living room. It showed the date/time, weather, his family calendar and a scrolling news feed. He pointed me towards his blog post explaining how he used WordPress to create it and after reading that, I was inspired to try and build my own digital sign.

Author Bio

Inspired by Adam's digital sign, I started down the road of building my own using the Joomla CMS as the foundation. It was coming along OK when I decided to seek further inspiration and found ... MagicMirror2.
There are thousands of projects that have been created for the Raspberry Pi. Readers of MagPi, the premier Raspberry Pi online magazine, voted MagicMirror2 as the best project for the Raspberry Pi, meaning it deserved some of my attention.
Note: Unlike many of the people that have built a sign using MagicMirror2, I have not actually built a frame for my monitor and put it behind a mirror. Mine is simply running on a spare monitor positioned on my desk.
First steps
I needed to acquire a Raspberry Pi. But what one to use? I decided to run with Pi 4 with 4gb of RAM. Overkill for the task, but I figured I would use the Pi for other things as well as the digital sign. Rookie mistake!
Then I decided to grab a Pi Zero to run my digital sign. This is a low-end Pi with 500kb of RAM. Boy, did I screw up here. Not realising there are several variations of the Pi Zero, I managed to order a Pi Zero with no WiFi capability.
Adam to the rescue again ... he had a spare Pi Zero W (the one WITH WiFi) lying around, so I traded him alcohol for his Pi Zero W and I was all set.
Setting up the Raspberry Pi
Having never used a Raspberry Pi before, I found the basic configuring of it very simple. Put it together, connect it to a keyboard, mouse and monitor (finding the right cables and adaptors was a little time-consuming), power it up and then follow the setup instructions. I'll be honest, while everything has a nice GUI interface, having some Linux skills available is a help in tweaking a few things along the road.
I wanted my MagicMirror2 running in portrait mode, so I needed to change this on the Pi. A really simple task. Just open Display Preferences and change the orientation.
Installing MagicMirror2
So now I had a Pi Zero up and running and waiting for me to install MagicMirror2. Simple enough. Just open a Terminal and follow the instructions: -
- 1. Download and install the latest Node.js version:-
curl -sL https://deb.nodesource.com/setup_10.x | sudo -E bash - sudo apt install -y nodejs - 2. Clone the repository and check out the master branch:-
git clone https://github.com/MichMich/MagicMirror - 3. Enter the repository:-
cd MagicMirror/ - 4. Install the application:-
npm install - 5. Make a copy of the config sample file:-
cp config/config.js.sample config/config.js - 6. Start the application:
npm run start
And there was gotcha number "I forget" in a long list. The installation failed at step 4. A foray into the MagicMirror2 forums disclosed that the architecture of the Pi Zero was not conducive to installing MagicMirror2. There was a work-around, but I needed to reset everything and start again. So, for the short term, I reverted back to my Pi 4 and started again. Eureka! Everything up and running and I had a basic MagicMirror2 running beside me.
Tweaking Raspbian
Having got MagicMirror2 running, I now needed to tweak Raspbian (the name for the Raspberry Pi operating system) so it had a nice clean interface and auto-started MagicMirror2. This required installing a few tweaks and editing a configuration file.
Unclutter
sudo apt-get update
sudo apt-get install unclutter
Xscreensaver
sudo apt-get update
sudo apt-get install xscreensaver
Auto-start
nano /etc/xdg/lxsession/LXDE-pi/autostart@xscreensaver -no-splash
@unclutter -idle 2
@xset s off
@xset -dpms
@xset s noblank
cd ~/MagicMirror
DISPLAY=:0 npm startTweaking MagicMirror2
Having restarting the Pi and confirmed that MagicMirror2 started automatically, it was now time to configure MagicMirror2 so it looked how I wanted. MagicMirror2 comes with a number of preinstalled modules and there is a large library of 3rd-party modules available. Each modules repository page includes instructions on how to install it. You definitely need to RTFM to make sure you install each module correctly, as the installation process varies.
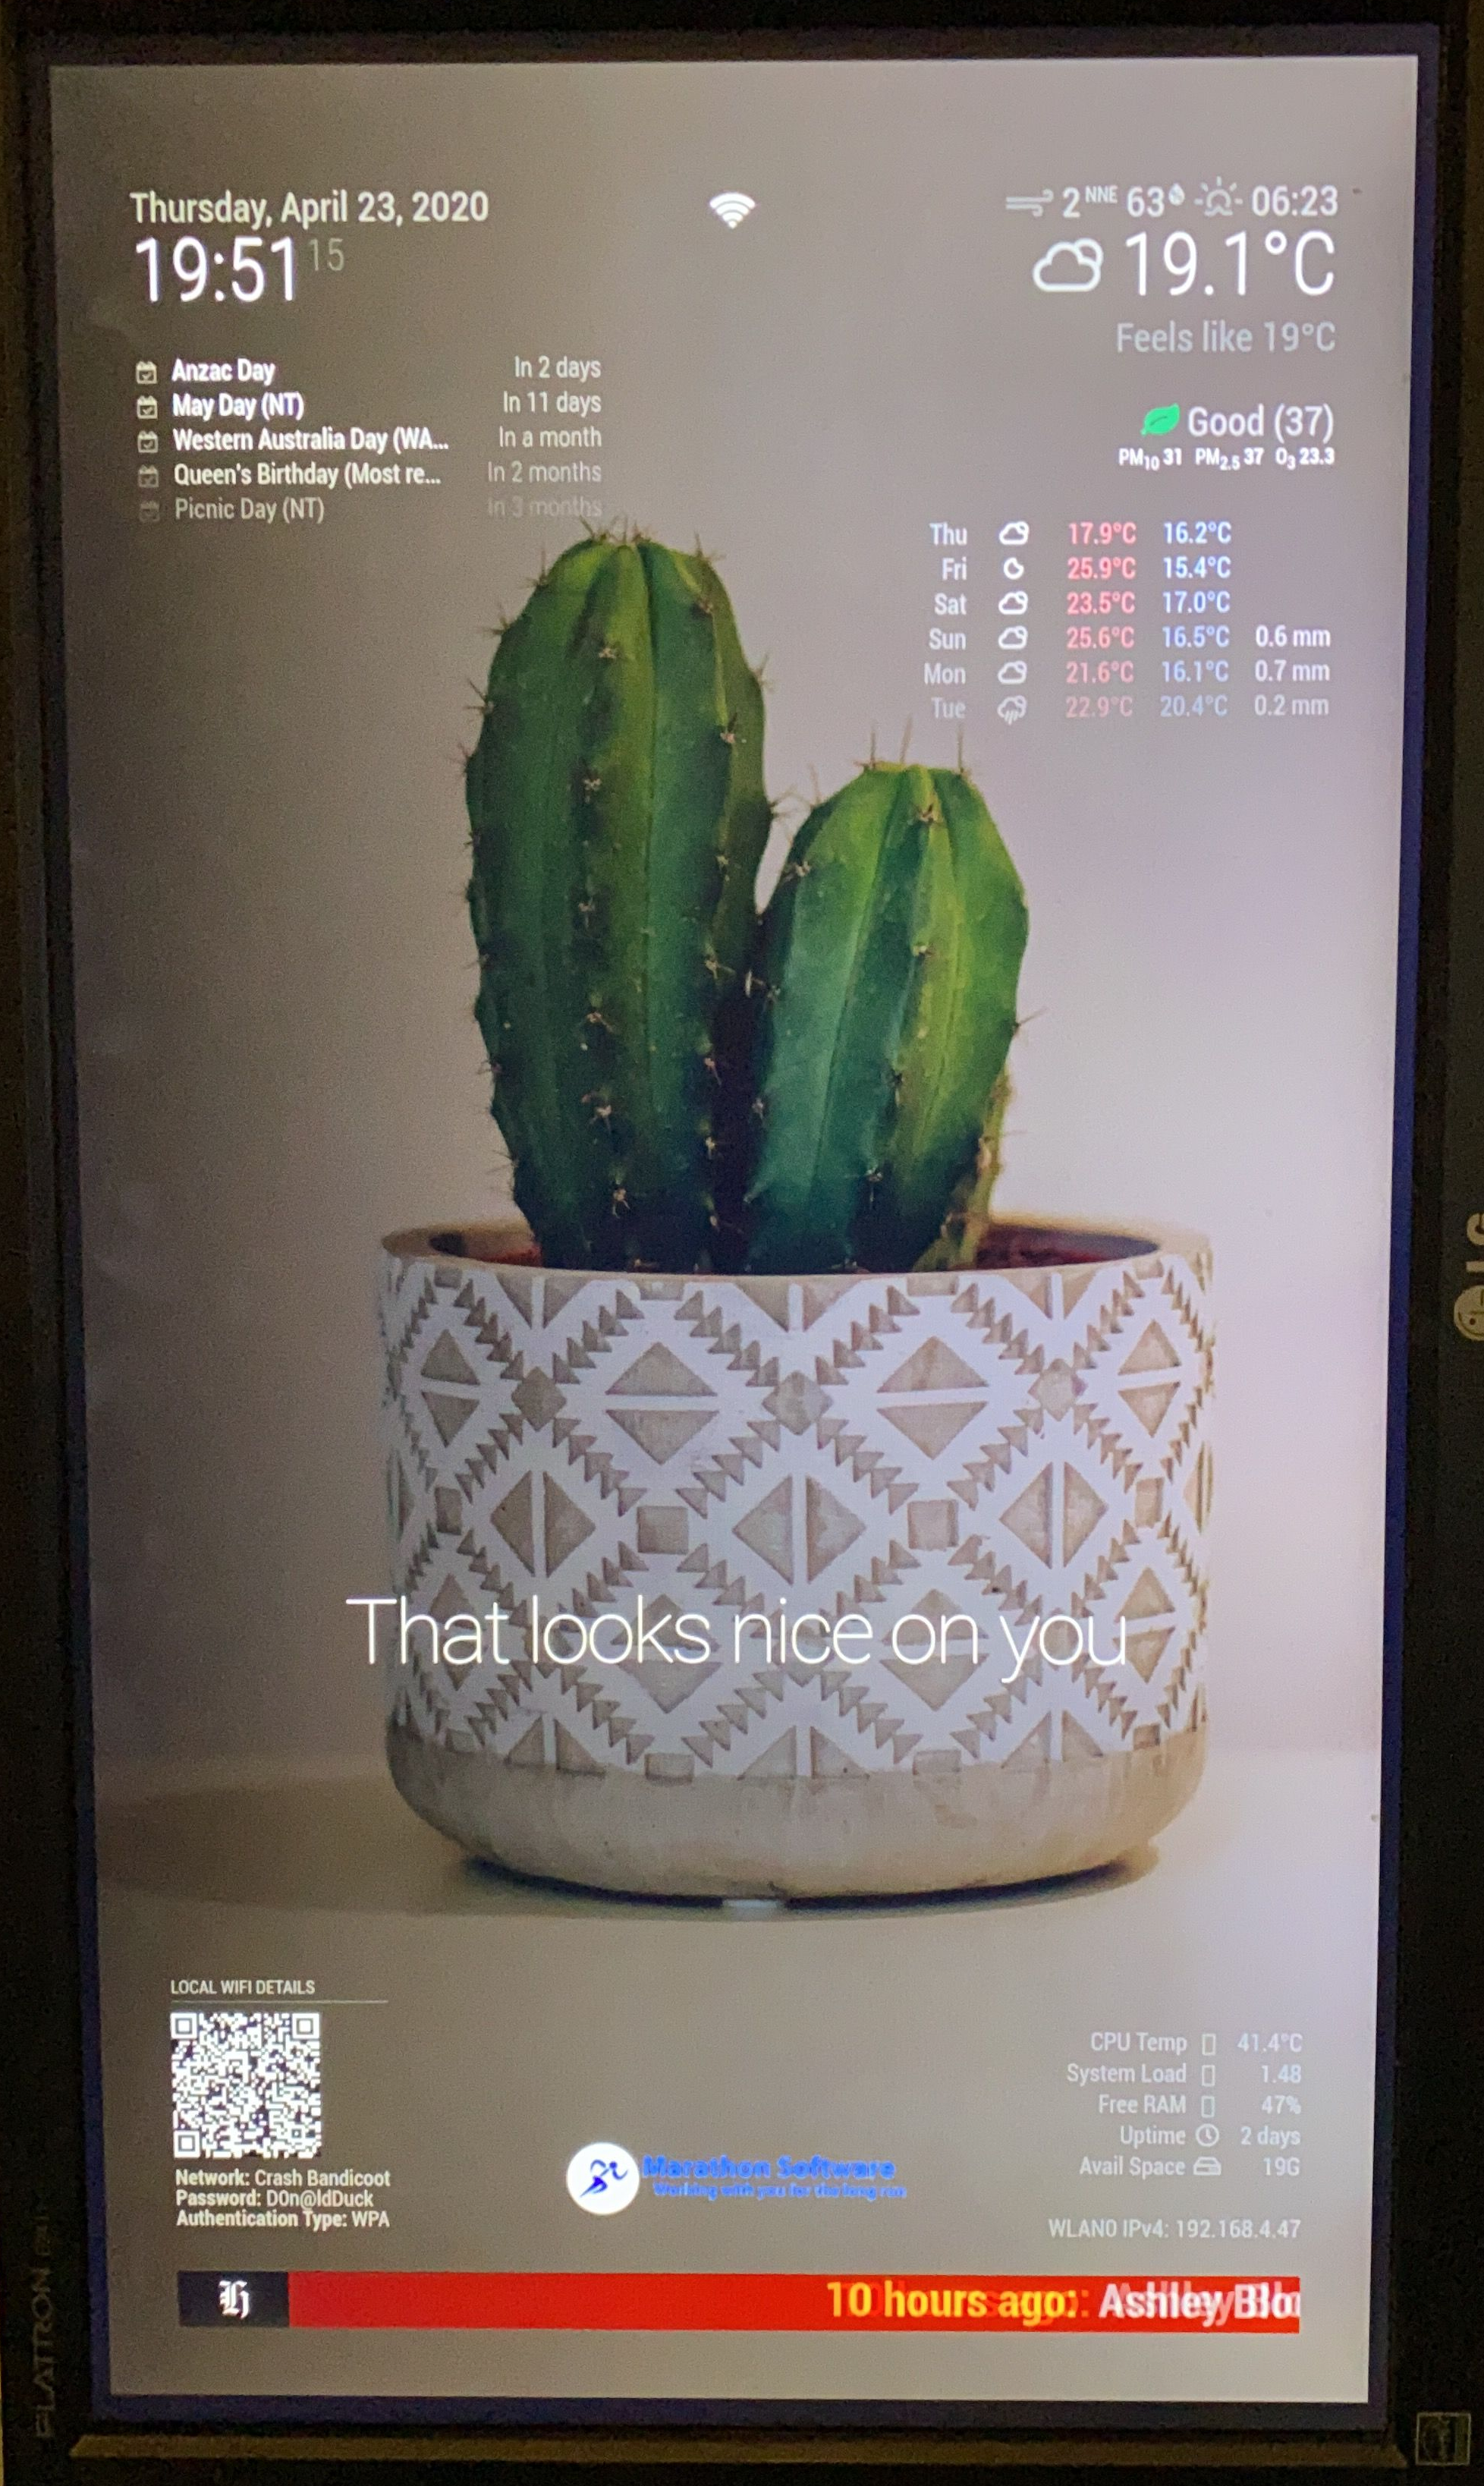
I've included a picture of the final result so you can see what it looks like and a list of the MagicMirror2 modules I used to achieve the outcome: -
- Remote Control - Manage your MagicMirror2 from a remote device (3rd-party)
- ModuleScheduler - Dim the screen and restart the Pi on a defined schedule (3rd-party)
- Unsplash - Rotate background images from defined Unsplash collections (3rd-party)
- Clock - Display the Date/Time (Core)
- Calendar - Display upcoming Public Holidays (Core)
- Sonos - Display the currently playing song on my Sonos speakers (3rd-party)
- Online State - Display the current WiFi strength (3rd-party)
- Current Weather - Display the current weather (Core)
- AQICN - Display the current Air Quality Index (3rd-party)
- Weather Forecast - Display the 7 day forecast (Core)
- Compliments - Display a rotating compliment from a defined list (Core)
- WiFi Password - Show my guest WiFi details including a QR Code (3rd-party)
- Simple Logo - Display my company logo (3rd-party)
- System Stats - Display the Pi system details (3rd-party)
- IP - Display the Pi IP address details (3rd-party)
- News Feed Ticker - Display news from defined RSS news feeds (3rd-party)
There are a number of positions that you can utilise to place the modules on the screen. Configuring a module is done by editing a config file (Linux skills come in handy here) as follows: -
cd ~/MagicMirror
nano ~/config/config.js
Each modules repository page includes configuration instructions. The configuration section conforms to a fairly easy to understand structure with each module having a list of parameters you can add within the structure to tweak the module. Again, RTFM is vital to successfully configuring each module!
After you have edited the config.js file, I strongly recommend running the following command to make sure that it conforms to all syntax requirements: -
npm run config:checkAnd to manually restart MagicMirror2, issue the following command: -
npm startOne thing that took me a while to figure out was how to shut down MagicMirror2 once I had it running. It's actually quite simple, just press Ctrl + Q.
Summary
Overall I am delighted with the outcome. Once I got my head around the configuration and stopped tripping over my inexperience with the Raspberry Pi, getting MagicMirror2 up and running is really simple.
I do intend to get it running on the Pi Zero at some stage, but with it running so smoothly on the Pi 4, I am in no rush to do so.
Now I just need to decide on my next Raspberry Pi project. I am thinking I will build a Raspberry Pi Cluster and run my web server on it to host all my analytical tools. Stay tuned!


